
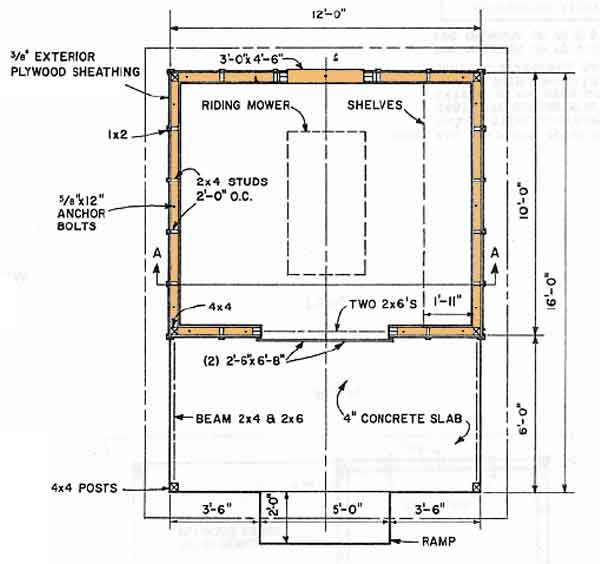
Here are some simple shed blueprints 12×16 with foundation and framing details.


It is easy to run out of storage space inside your home for keeping all your tools and equipment. You definitely can’t throw away all that equipment, tools and materials. So it will be a good idea to get some 12×16 shed blueprints and build yourself a nice outdoor shed cum workshop for keeping all your stuff.
Now that you have decided to build your own shed, you need to think over a few things to ensure that your shed building project goes through like a breeze from start to finish.
First decide which style of shed you are going to build the shed. Take a look at your backyard and visualize where you will be building the shed. This will allow you to picture what kind of shed will look best on the landscape.
Next, consider what tools you will need to finish building the shed. You may have some of the tools already. But make a list of all the tools you will need for building various parts of the shed and then check that you have them all. Usually the storage shed blueprints will contain a list of the tools needed. If you do not have any tools, buy or borrow the missing tools based on your budget.
Different kinds of techniques can be employed for building various sections of the shed like the roof and the foundation. Research the commonly used techniques and find which one will be the easiest and fastest for you to use.
The next important task you need to do is to check with the local building department to see if you are going to need any building permit. In that case you will need to fill out some forms and submit your shed blueprints 12×16 for approval. Once you have taken care of this, you can move on to construction.
Here are some basic steps of how you can build your shed project.
You need to start with the foundation. Refer to your shed blueprints 12×16 and pick out the sizes of the timber boards you need as per the blueprints. Lay down boards on the ground to mark out the base of the shed. Use a spirit level and make sure all the boards are perfectly level. Dig out a trench about 4-6 inches deep within the boundary formed by the boards. Pour the concrete within this trench and leave it to dry for at least a day.
Get all the timber and materials needed for the shed delivered well in advance before you start building the shed.
Start with the timber plates and place them around the outer edge. After you have cut them to length on all sides, repeat the same with another plate by placing it on top of the earlier one and cut it out to the same length.
Fix the spacing for the studs on these plates. Begin at each corner and place a mark at every 2 feet. Check that you have one stud where the 4 feet sheet will join. Mark out the studs for doors and windows and also square the marks on top of the two plates. This will give you a pair of matching plates.
Turn the plate pair onto their edge and separate them enough to lay the studs in between on each mark. Cut out all the studs to length prior to starting. Next, nail the studs with each other through the 2 plates to complete one wall.
Measure the diagonal of the wall to ensure it is properly square. Secure the wall with a diagonal brace fixed at 45 degrees. Simply tack the brace for now so that you can move it later if needed.
Hoist the wall frame into place and secure it temporarily using a peg driven into the ground. Now repeat the same process with the remaining wall plates and secure all the 4 wall frames in place.
The top wall plates of adjacent wall frames are fastened to each other using a metal fastener. The bottom wall plates of adjacent frames are just nailed to each other.
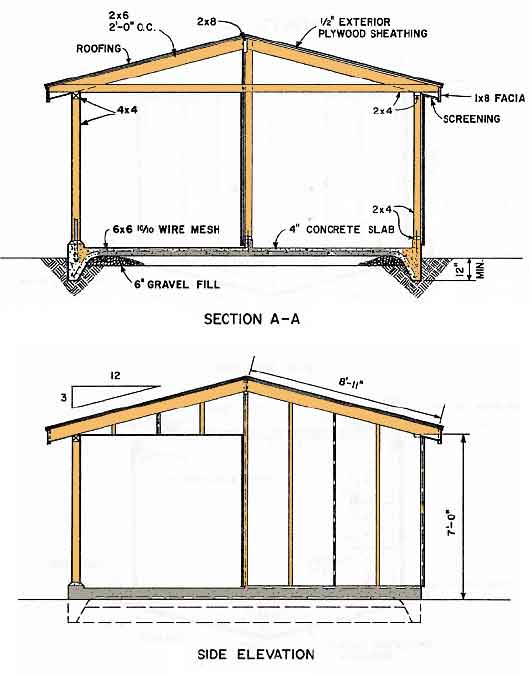
But before you do this, you need to select the roof design next. The easiest design is to have a lean-to style roof. For this style roof you will need to make one wall frame a little shorter than the other walls, so that you can simply lay down the rafters and build a lean-to roof.
The two walls which hold the rafters must be angled at the top so the studs will need to be cut angled separately from the other wall studs.
Secure the corners with additional studs. Make the corners plumb and level and secure the walls by nailing down braces.
Now you can fix the rafters. The rafters need to be about 2×4 in size or larger depending on how strong you want the roof. Building a strong roof frame will allow you to hand things from the rafters later. Keep the rafters about 3 feet apart and secure them to the top plate by nailing. Make sure the rafter is long enough to allow for extra overhang on either side of the shed. You will need to secure roof battens on top of the rafters for fastening the nails. Fasten the battens at intervals of 30 inches.
You can use diagonal metal bracing strips for securing the rafters and make the roof stronger.
Next attach the lining over the roof frame. Make it long enough so that you can cover the rafters and also butt beneath the iron to make a completely enclosed shed. Fasten the iron over the roof. Lastly install the doors and windows and paint the shed.
Additional accessories for your shed
Tanalised Flooring
Tanalising is a process in which a mixture of chemicals is impregnated into the floor of the shed at high pressure. This protects the shed base from rotting caused by water or pests.
If the shed base remains wet for long due to groundwater or humidity it can attract a variety of pests like termites which will eat into the wood and weaken the base. Tanalising fills up all the microscopic holes in the wood and protects the floor by making it stronger so that pests cannot live inside it.
Lighting Accessories
It may be necessary to fit artificial lighting inside the shed to make it possible to work inside it at night time. If the main electric lines cannot be drawn out to the shed then you may need to consider solar power based lighting equipment.
Security Accessories
Once you have made sure that your shed is protected from the elements of nature, the next step is to protect it from burglars. Enhancing the security of the shed can be as simple as putting padlocks on the doors. If the door is not strong enough you may need to reinforce it with metal bracing. Another popular option is to use an alarm system which will set off a siren if any doors or windows are forced open.
