
These storage shed blueprints for an 8 x 10 shed has easy to build design and simple joints. It has a gable roof and high walls.


Storage Shed Blueprints 8×10 : Step By Step Instructions
Step 1: Ready the construction site with a 4 inch thick layer of leveled and compacted gravel. Cut out three 6 x 6 wooden skids. Arrange the skids according to the floor framing plan part of the storage shed blueprints. Position a 2 x 4 straight along the skids and ensure they are correctly level.
Step 2: Cut out two 2 x 6 rim joists and 9 joists. Frame the floor frame using galvanized nails, referring to the floor framing plan in the storage shed blueprints. Verify that the frame is square by measuring the length of the diagonals.
Step 3: Place the floor frame on the skids and then measure the length of the diagonals to ensure it is square. Next, setup the joist clip angles at each joist across the 2 outer skids using galvanized nails. Toenail each of the joists to the central skid.
Step 4: Setup the tongue and groove floor sheathing made of plywood, beginning with a complete sheet at one of the corners of the frame. The flooring must extend to the outer edges of the floor frame.
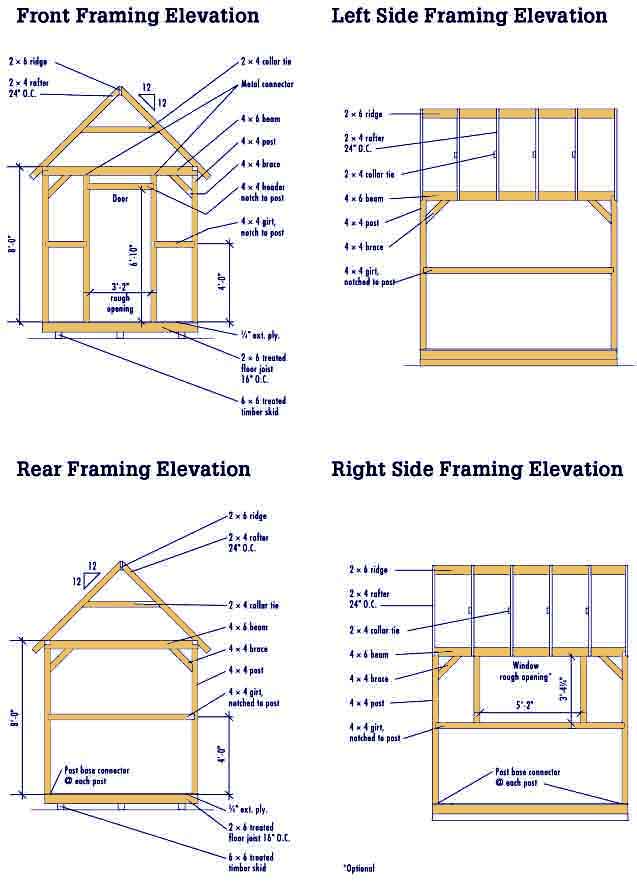
Step 5: Prepare the wall posts by cutting six 4 x 4 posts (90 ½”) and ensure that both ends are perfectly square. Mark 3 ½” long x 1 ½” deep notches on each of the 4 corner posts on the two adjacent inner faces of every post for fitting girts. Begin the notches about 46 ¼” from the lower end of the posts.
Step 6: Mark the notches for receiving a girt on each door frame post at 46 ¼” and mark the notch for the door header at about 82”. Refer to the front framing elevation diagram in the (shed blueprints 10×12) storage shed blueprints. Get rid of the excess waste timber from the notch regions using a circular saw and finally finish cleaning up with the help of a broad wood chisel. Check that the notches fit to ensure that the 4 x 4 girts would fit tightly.
Step 7: Arrange the bases of the posts such that the posts are flush with the outer edges of the shed floor. Setup the post bases using 16d galvanized nails. Check that the inner edges of the door posts are 29” from the sides of the floor. Secure each post such it is accurately plumb, and then secure it to its foundation according to the base manufacturer’s suggested fasteners.
Step 8: Cut out two 4×6 beams of 10 feet and two of 8 feet. Then ends of the beams must be notched for half-lap joints. Measure the depth and width of each of the beams and check off notches of same size as the width and 1/2 of the depth. Align the notches referring to the framing elevations in the storage shed blueprints. Cut out the notches using a handsaw, and check that they fit the Joints. Make any needed fine adjustments using a chisel.
Step 9: Place an 8 feet beam on the front wall posts and fasten it in place with a 16d nail on each end. Secure the other 8 feet beam with the back posts. Arrange the 10 feet beams on the short beam ends and form the half lap joints. Check the length of the diagonals in the front wall frame to ensure that it is accurately square. Lastly, anchor the beams using two 60d nails at each corner. You can bore pilot holes for fitting the nails.
Step 10: Strengthen the beam connections using a metal post-beam connector on the outer edge of every corner and along both sides of the door posts with fasteners. Setup an L-connector on the inner edge of the joints between the beams referring to the EAVE DETAIL section of the storage shed blueprints.
Step 11: Cut out eight 4×4 corner braces, and miter the ends at 45 degrees. Setup the braces level with the outer edge of the corner posts and beams with two 3/4 x 6” lag screws by driving them into pilot holes.
Step 12: Measure the distance between each of the posts at the notches, and cut out 4×4 girts to fit. For ensuring that the girts will meet at the corner posts, cut a 1/2 x 1/2” notch at the outer ends of the front wall girts and each end of the rear wall girts. Setup die girts using adhesive and two 20d nails driven through pilot holes on the outsides of the posts. Cut out and install the 4×4 door header similarly.
Step 13: Cut out 2 pattern rafters with the help of the rafter template. Check that the patterns fit and then cut out the remaining 10 rafters. Cut out the 2 x 6 ridge at 120 degrees. Setup the ridge and rafters using 24” center spacing. Cut out four 2 x 2s which will extend from the peak of the roof to the ends of the rafters. Set them up level with the tops of the end rafters as shown in the storage shed blueprints in the gable overhang detail. Install framing connectors at the connections between the rafters and beams excluding the outer rafters.
Step 14: Cut out four 2×4 collar ties at 58 degree and miter the ends at 45 degree. Setup the ties 12” beneath the top of the rafters, referring to the framing elevations.
Step 15: Setup the 1 x 8 siding onto the rear and front walls so that it extends from the 2 x 2s along the end rafters and then down to 3/4 ” beneath the bottom of the floor framing. Secure the siding using 8d finish nails. Do not nail the door header with the siding yet.
Step 16: Use 1 x 4 subfascia to cover the ends of the rafters along the eaves and make it level with the tops of the rafters as shown in the storage shed blueprints eave detail. Setup the 1 x 2 trim and 1 x 6 fascias at the gable ends along the eaves. Miter the corner joints as needed. Position the fascia and trim 1/2“ over the rafters making sure it remains level with the roof sheathing.
Step 17: Rip out the plywood soffit panels and make it fit between the fascia and wall framing. Secure them with 3d box nails. Refer to the eave details in the storage shed blueprints. Install siding on the side walls and butt the top ends to the soffits.
Step 18: Cover the roof with 1/2 ” sheathing of plywood, beginning at the bottom corners. Install the sheathing using building paper and make it overhang the 1 x 2 fascia trim by about 3/4″. Setup the asphalt shingles or shingle roofing. Attach roof vents as needed. Cover the roof at the peak using a 1 x ridge cap
Step 19: Build the frame for the door using 3/4 x 4 ¼” stock. Cut out the head jamb at 37 ¾” and the side jambs at 81”. Secure the head jamb over the side jambs ends using 2 ½” deck screws. Setup the door frame in the opening for the door with shims and 10d casing nails. Install 1 x 2 stops for the jambs, 3/4“ from the outer edges.
Step 20: Build the door using 7 pieces of 1 x 6 siding which are cut at 80 3/4 “. Setup the boards with each other, then check off and trim the outer pieces such that the door remains 36” wide. Secure the 1 x 6 Z-bracing using adhesive and 1 ¼ “ wooden screws, as seen in the door detail section of the storage shed blueprints. Setup the flashing on the outer side of the door and install 1 x 3 trim around both sides of the door opening according the door jamb detail diagram. Suspend the door using 2-3 strap hinges.
