
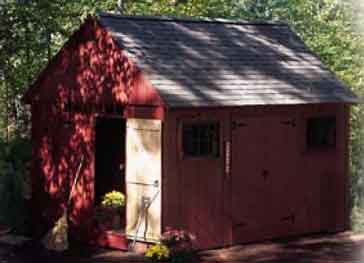
These wood shed blueprints will help you build an outdoor gable shed with large windows, 2 double doors and a partition which separates the shed into two rooms.
Build The Shed Foundation
This shed is supported by a foundation of concrete blocks. The blocks are 4x8x16 inches in size and positioned in 3 rows at a distance of 59 inches from each other. A 4 inch gravel bed is laid on the ground before setting the blocks. This helps to soak up the groundwater and keeps the soil from becoming muddy.
Check that the concrete blocks are level using a spirit level and a wooden board. Use shims of asphalt roofing or smaller concrete blocks to support the blocks which are uneven and make them level.

Build the rear and front band joist using a 2×6 nailed to a 2×8 mudsill. Place the mudsills over the top face of the blocks connecting the front and rear of the shed. Cut out another 2×8 mudsill and place it over the central row of blocks.
Cut out the 2×6 joists from pressure treated timber and place them in between the two band joists over the mudsills. Place the joists about 16 inches at center and fasten them using 16d nails.
Fasten the floor framing with ground anchors. Bolt each corner of the frame to one anchor and drive the spikes which hold the anchor deep into the ground. This must be done before you attach the plywood flooring.
Install the 2×6 floor joists over the 2×8 mudsills. Install a 2×6 floor joist at every 16 inch interval and secure them with 16d nails to the band joists.
Use 0.75 inch plywood with tongue and groove joints for constructing the shed floor. This will ensure that the floor won’t sag or bounce. Fasten the plywood using 8d nails.
Build the Walls
Cut out 2×4 boards for the walls and place them on the floor of the shed. Position the studs at intervals of 24 inches and fasten them using 16d galvanized nails. Cut out the siding from plywood sheets according to required size and secure them to the wall frame using 6d nails.
Construct the outer walls on the shed floor. Secure the 2 x 4s to each other using 16d nails and finally install the plywood sheathing.
Hoist the wall into place and fasten it using 3 inch deck screws. Build and hoist the rear wall and then the front wall. Next, setup the internal partition. Sheath the face of the partition which faces the room with plywood and secure it in position using screws referring to the wood shed blueprints.
Finally, hoist the last wall into position. Make sure that the sidings run below and cover the floor frame.
Drive screws through the bottom 2×4 plate into the floor frame for each wall and secure the walls in place.
Building the Roof Trusses
Every truss is built using two 2×4 rafters and one 2×4 roof joist. These 3 boards are connected to each other using 1/2 inch gussets of plywood.
Construct the trusses on the ground before you hoist the walls. Begin by cutting the rafters to accurate length keeping an angle of 40 degrees at each end. Cut out 2x4s of 10 feet length for building the bottom chords of the trusses. Cut out all of the gussets from plywood sheets.
Construct a template for installing the trusses on the shed floor. Start by placing the sections for one truss. Make the lower chord plumb with the floor’s edge. Cut out four 2x4s of 24 inches length. Place them beside every rafter and fasten them to the floor using screws.
Build each truss by using these boards as stop blocks. Secure plywood gussets to every side of each truss using glue and roofing nails.
Construct all the roof trusses on the floor of the shed. Secure the joints on either side of the trusses by nailing plywood gussets.
Build the Roof
Construct the roof frame by positioning a sheathed truss at either end of the shed. Fasten these by driving 3 inch screws through the top wall plate. Setup the other roof trusses by fastening one on each wall stud using deck screws driven through the upper wall plate.
Build the roof by setting up the end trusses. Check that the plywood siding is secured with nails before you raise the truss. Use a 2×4 chord for strengthening the sheathing.
Place the roof trusses over the walls at 24 inch intervals and fasten them using 3 inch deck screws.
Sheath the trusses using plywood and then cover them with asphalt shingles. You will need about 8 bundles of shingles to completely cover the roof.
Final Touches
Fasten a hardboard sheet to the partition wall of the storage area in the shed and secure it with 1 inch screws. Setup a window on top of the doors at the gable end. Construct a 5 feet long transom window using a plain timber frame for supporting the glass.
Construct the door using 1×6 cedar boards containing tongue and groove cuts. Secure the battens to the door using 1 inch screws and suspend the doors using high strength strap hinges.
Use barn sash windows made of wood. These windows are usually available in 2×3 feet size at most timber yards. Secure the top of the sash with a barrel bolt to make sure the windows can be locked shut. Slide the window into the frame and position it on the sill.
Finally paint or stain the shed as per your preference.
